 Providing Feature-Rich File Services with Samba and LDAP Providing Feature-Rich File Services with Samba and LDAP
Tom O'Donnell
While many people view Samba as a way to enable
Windows networking on Linux and related systems, it's actually an
implementation of the cross-platform SMB (Server Message Block) protocol,
which was developed by IBM back in the mid-1980s. Although Microsoft has
extensively used and extended SMB -- they even coined an alternate
name for it: Common Internet File System or CIFS -- the protocol has
long been a part of Linux as well. In fact, Samba was born not long after
Linux, back in the days of Windows 3.1. Since then, Samba has evolved into
a stable, feature-rich software suite, and now it's just as viable a
solution for serving network files to Windows clients as using actual
Windows servers.
In fact, many Samba deployments involve setting up a
Primary Domain Controller (and potentially even Backup Domain Controllers)
to provide features associated with Windows-style domains, particularly
central authentication for file access. There is an alternative approach,
however, which provides many of the same benefits without the need for a
PDC. By tying Samba to LDAP, you can provide network file services with
central authentication as well as other perks, like access control lists
and a server-side recycle bin. The end result is a file serving solution
that rivals proprietary operating systems, like Windows or Netware, yet is
built entirely out of open source components.
To accomplish this feat, you'll need at least
one server running Samba and one server running LDAP. They can be on the
same machine or separate, and there are benefits to using more than one of
either. For example, one LDAP server can operate like a domain controller
by providing authentication for Samba shares on several servers, while
multiple directory servers can (through LDAP replication) provide
distributed authentication across the network, not unlike Active Directory.
In this article, I will explain the steps required to
get Samba running, as well as what modifications are needed in LDAP to
properly authenticate end users. To keep the story focused on Samba,
I'll assume that you already have an LDAP directory installed and
populated with users. If you need help getting to that point, consult the
OpenLDAP Administrator's Guide at:
http://www.openldap.org
While this demonstration was assembled on Fedora Core
5 with Samba 3.0.23b and OpenLDAP 2.3.24, it should work about the same on
other distributions and with other LDAP providers, as long as the version
of Samba is 3.x. The paths given for Samba and OpenLDAP files are based on
builds using default locations. For simplicity's sake, we'll
assume both services are running on the same machine.
Installing Samba
The first objective is to download and build the most
recent Samba release, which is available at:
http://www.samba.org
with the filename samba-latest.tar.gz. Once
downloaded, the following commands handle the installation:
tar -xzvf samba-latest.tar.gz
cd samba-version_number/source
./configure --with-acl-support
make
make install
The only configure option we need is the one to
support access control lists. There is a "--with-ldap" option,
but it's set to yes by default, so we don't need to include it.
For the ACL option to be of any use, the file system
where the shared directory is located must be mounted with that option
enabled. You can do this by adding the appropriate flag to the share
point's entry in /etc/fstab. In this case, assume that we have /home
on a partition and will put our shares there:
/dev/sda2 /home ext3 defaults,acl
Note that many file systems (including ext2/ext3) have
ACL support built into the 2.6 kernel, but you'll likely need a
kernel patch if you're using 2.4.
Configuring Samba
Once the installation is complete, we can edit the
configuration file smb.conf (located in /etc/samba/ or
/usr/local/samba/lib/, depending on the Samba version) to set up the server
and its shares. There are plenty of options available for this file,
including security and performance tweaks you should investigate before
unleashing Samba on your production network. To learn more, consult the
voluminous man page for smb.conf or the annotated sample file that is
installed with Samba. For this demonstration, let's keep it
relatively simple:
#====================== Global Settings ===========================
[global]
   #--- server identity
   workgroup = sampleworkgroup
   netbios name = sambaserver
   server string = Just a sample Samba server
   #--- logging options
   log level = 2
   debug pid = yes
   debug timestamp = yes
   debug uid = yes
   #--- LDAP authentication settings
   passdb backend = ldapsam:ldap://localhost
   ldap suffix = dc=example,dc=com
   ldap user suffix = ou=people
   ldap admin dn = cn=Manager,dc=example,dc=com


#====================== Share Definitions ===========================
[sharedata]
   #--- general settings
   comment = Something for everyone
   directory = /home/shared
   read only  = No
   hide unreadable = Yes
   #--- settings for the recycle bin
   vfs objects = recycle
   recycle:repository = /home/shared-recycle/
   recycle:noversions = 2

[secretdata]
   directory = /home/secret
   browseable = No
   valid users = jack jill
   hosts allow = 192.168.1.0/255.255.255.0
The configuration is divided into two sections, Global
Definitions and Share Definitions. The global settings define qualities of
the server itself, such as the workgroup to which it belongs, its NetBIOS
name, and its server string, which is simply the description that clients
will see when browsing the network. To help troubleshoot later, we include
relatively verbose logging options. And, we add some settings related to
our LDAP server.
Below the global section are the definitions of each
share. In this example, we've created two contrasting shares, one for
everyone on the network and another just for a select few. The first starts
with a descriptive comment (again for client browsers) and the server-side
location of the shared folder. We also need to indicate that the share is
not read only, since the default is to make it so. By including "hide
unreadable = Yes," we set it so that end users will only see items
that they are able to access. There is one more permissions-related setting
we want, the "nt acl support" flag, but it's set to yes
by default, so we can omit it.
In addition to the parameters inherent in smb.conf,
Samba 3 introduces new tools in the form of add-on VFS modules. Some of
these, like a shadow copy utility and a module to help support Netatalk
(the Unix/Linux implementation of AppleTalk), are included as part of the
standard Samba install. Others, such as a virus scan integrator from http://www.openantivirus.org, are available separately. Our server uses one of
the included modules: the recycle VFS. This handy tool, analogous to
Netware's "Salvage File" utility, keeps deleted or
modified files in a separate location for easy restores. We're even
keeping multiple versions, just in case.
The second share is aptly labeled
"secretshare", as the last two lines restrict access to only
certain users, and they can only get there from one private subnet. The
parameter "browseable = No" ensures that clients won't
see this share in network browsers -- akin to tacking "$"
onto the end of a Windows share name -- so the only way to get there
is to type the path directly. Because we don't specify otherwise, the
share defaults to read only, which is probably for the best, since we
don't set up a recycle bin either.
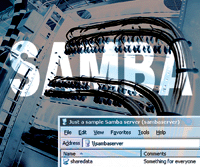
Based on our smb.conf file, Figure 1 shows how a
Windows XP client will see the server in "My Network Places"
when we're up and running. This shows many of the settings at work:
the server string, the server NetBIOS name, and one of the share names with
its share comment. Note that the second share isn't visible, because
we specified that it not be browseable.
Although this example doesn't use them, Samba
offers a couple of unique shares with special properties. One of these,
distinguished by the name [homes], maps private home directories for
individual users. The [printers] share is another and, not surprisingly, it
deals with SMB shared printers. For more information on this, consult the
Samba documentation.
Before we move on, we need to let the Samba server
know the password for the LDAP admin account listed in smb.conf. To
accomplish this, we use the multipurpose utility smbpasswd with a
"-w" designated just for this purpose. It takes the password
(in this case, the default for the Manager user in OpenLDAP) as a parameter:
smbpasswd -w secret
Testing the Samba Server
At this point, we should be able to start Samba and
test it. There are two daemons involved: smbd, the actual file-serving
process, and nmbd, which helps the client and server find each other over
NetBIOS. You can start both with one command:
/etc/init.d/smb starts
To make sure these processes begin running at boot,
enable this script in your run-level startup.
When you edit and save smb.conf, the server often
picks up on the change automatically, so there's usually no need to
restart the daemons for the new settings to take effect. Changing a key
identifier -- the server's NetBIOS name, for example --
does call for fresh start, however:
/etc/init.d/smb restart
You can check your progress so far by attempting to
contact the server using its UNC path name \\sambaserver from a Windows
client. You won't be able to authenticate, but you should at least
get a login box on the client. If not, or if Samba wouldn't start at
all, you may be able to tell why by tailing /var/log/samba/smbd.log, the
default log file. Samba also includes a useful utility called testparm,
which parses your smb.conf file and displays relevant errors or warnings.
Finally, if the client and server can ping each other but Samba
doesn't appear to work, be sure they can communicate over the ports
involved, UDP 137-138 and TCP 139.
Configuring LDAP
To prepare LDAP as an authentication source, we need
to add some new attributes to our directory. These attributes aren't
part of a stock OpenLDAP install, so we need to extend the schema. To
begin, go back to the unzipped Samba download and copy the file
samba-version_number/examples/LDAP/samba.schema to
/usr/local/etc/openldap/schema/ (or whatever folder contains your other
schema files). Then add the following lines to
/usr/local/etc/openldap/slapd.conf:
include /usr/local/etc/openldap/schema/cosine.schema
include /usr/local/etc/openldap/schema/inetorgperson.schema
include /usr/local/etc/openldap/schema/nis.schema
include /usr/local/etc/openldap/schema/samba.schema
The first three files are installed (but not included
in the default configuration) with OpenLDAP, and they're commonly
used, so you may already have some of them enabled. The last file
introduces the Samba-specific attributes. Remember, you'll need to
restart the LDAP server for the schema extensions to become available.
These directory changes add two new object classes and
several resultant attributes that our accounts will need. The first class,
sambaSamAccount, provides attributes relating to authentication, including
sambaSID (a unique identifier for each Samba account), sambaNTPassword (a
Windows NT hash of the user's password), and sambaLMPassword (a
LANMAN hash of the password). The other class, posixAccount, adds uidNumber
and gidNumber to give users Unix-style user and group numbers, which allow
them to own and access files just like local users.
Now the question is: how do you populate these fields
for your LDAP user accounts? Unfortunately, there isn't an easy
answer. We could almost do it using ldapmodify commands and some
well-crafted LDIF files, but the sambaLMPassword and sambaNTPassword
attributes expect encrypted values, so we can't just insert a
plain-text password. Fortunately, because Samba is looking to LDAP as its
authentication source, the smbpasswd utility is now equipped to set or
change those password hashes for us. However, the user accounts don't
have the required sambaSamAccount object class yet, so running smbpasswd to
set the attributes will fail.
One way through this is to make an LDIF file that adds
the object classes and all attributes except the passwords, then run
smbpasswd to set the password hashes. To go this route, we'd need a
fixuser.ldif file like this:
dn: cn=username,ou=people,dc=example,dc=com
changetype: modify
objectClass: person
objectClass: sambaSamAccount
objectClass: posixAccount
uidNumber: 10418
gidNumber: 100
homeDirectory: /home/username
uid: username
sambaSID: S-1-5-21-3182778698-226005414-4011289646-21836
Keep a few pointers in mind when determining which
values to use. Most importantly, uidNumber, uid, and sambaSID must be
unique for every user in the directory. The uid is often the same as the
user's cn, while the uidNumber is conventionally over 1000. Though we
haven't dealt with groups up to this point, they can be Samba-enabled
in LDAP, too, so the gidNumber can be relevant to file access. For now,
what's important is that users have a gidNumber, since it's
required for the posixAccount class. The homeDirectory attribute is also
mandatory, and it has an added role if you make one of those special
[homes] shares, since it provides the path that will map to the
user's home location.
The lengthy sambaSID is composed of two parts, the
domain's SID and a unique number for the user. To find the domain
SID, use this command:
net getlocalsid
You could theoretically set the user part to anything,
as long as all users' sambaSIDs are different, but the convention is
to take the uidNumber, multiply it by two, and add 1000 -- hence the
"21836" is this user's sambaSID.
Then we can add all the changes to the directory with
an ldapmodify command:
ldapmodify -x -D cn=Manager,dc=example,dc=com -W -f fixuser.ldif
After that, we can set the password attributes with smbpasswd and a uid:
smbpasswd username
There are alternatives to using LDIF files and
smbpasswd, and they may be applicable in certain situations. If you
don't have many users to change, you can do the job through the
phpLDAPadmin Web front end (available at http://phpldapadmin.sourceforge.net/), which will kindly encrypt passwords as
needed if you enter them as plain text. For a bigger job, PADL software
offers a number of Perl scripts (available at http://www.padl.com/OSS/MigrationTools.html) to assist with migration from flat
files and other directories. In addition, the smbldap-tools package
(available at http://sourceforge.net/projects/smbldap-tools/) includes
tools which, though intended for Samba/LDAP scenarios with domain
controllers, may also be of interest. If nothing else, the Perl scripts at
these sites show you which functions to use if you want to write your own
code to encrypt and store passwords.
Once the user accounts are ready, we need to let the
operating system know about them, so they can be used for file ownership
and permissions. To do this, alter the Name Service Switch file,
/etc/nsswitch.conf, adding "ldap" to the following lines:
passwd:     files ldap
shadow:     files ldap
group:      files ldap
Putting It All Together
Now that both Samba and LDAP are ready, we're
almost done. All that's left is to create the shared folders and
grant access to users. For simple situations, the usual Unix ownership and
permissions will do:
mkdir /home/shared /home/shared-recycle
chmod 755 /home/shared
mkdir /home/shared/jacks_files
chown jack:root /home/shared/jacks_files
chmod 755 /home/shared/jacks_files
Now Jack owns his files, but others can read them if
they want.
For more complex needs, we can use an access control
list:
mkdir /home/shared/jills_files
chown jill:root /home/shared/jills_files
chmod 700 /home/shared/jills_files
setfacl -m mask::rwx /home/shared/jills_files
setfacl -m user:jack:rwx /home/shared/jills_files
setfacl -m user:john:rx /home/shared/jills_files
This way, Jill and Jack have full access, John has
read access, and no one else can get in at all -- an arrangement we
couldn't offer using only chown and chmod. The ACL mask sets the
maximum possible permissions; in this case we set it to rwx, so we can give
Jack full access. A long format listing shows that the folder's
permissions now end with a plus sign, which denotes extended attributes.
The particular user rights can be verified with the command:
getfacl /home/shared/jills_files
Though only Jack and Jill have access to the
"secretdata" share through Samba, it's still a good idea
to set its permissions to 700, chown it to root, and use an ACL, so
unauthorized local accounts can't get to the files on the server:
mkdir /home/secret
chmod 700 /home/secret
chown root:root /home/secret
setfacl -m mask::rx /home/secret
setfacl -m user:jill:rx /home/secret
setfacl -m user:jack:rx /home/secret
Now if you connect from a Windows client using the
Samba share's UNC path, you should be able to authenticate as one of
the LDAP users you modified, and you should see whatever files and folders
the user has rights to. In our example, if you log in to
\\sambaserver\sharedata as Jack, you'll see "jacks_files"
and "jills_files", while logging in as Jane will only show you
"jacks_files". You may not even have to log in again, if your
local username and password match those in LDAP. When you first access the
Samba server, Windows tries the local credentials against the server first,
and if they work, your client will connect automatically.
If you're still unable to authenticate, the
Samba logs will likely tell you why. One common error message is
NT_STATUS_WRONG_PASSWORD, which means that the password you entered
doesn't match the hashed Samba password values in LDAP. Another error
you may see is NT_STATUS_NO_SUCH_USER, which means that the LDAP account
lacks one or more of the posixAccount or sambaSamAccount attributes. If
troubles persist, you might try restarting Samba and OpenLDAP, just to make
sure they've caught all the configuration changes.
Once the server is running and clients are connecting,
you can check your progress with smbstatus, another tool in the Samba
suite. Its output shows which users are connected, which machines
they're connected from (by computer name and IP address), and which
files they have open.
Conclusion
Using this Samba/LDAP set up as a foundation, you can
build even more complex functionality. You can tie LDAP groups into Samba,
then set permissions by groups as well as users. You can map shares to
client drive letters with the Windows command-line tool "net
use". Using the open source tool pGina (http://sourceforge.net/projects/pgina/), you can even set your client machines' initial
login to bounce off LDAP, run network login scripts, and use roaming
profiles. The possibilities are intriguing, and with Samba version 4
development well underway, they're likely to get even better.
Tom O'Donnell is a network and server
administrator at the University of Maine, Farmington. He acknowledges his
co-workers Aaron Gagnon and David Irving for their wisdom and counsel on
Samba and LDAP matters. Tom can be reached via email at: tomod@maine.edu.
|