[Click image to view at full size]
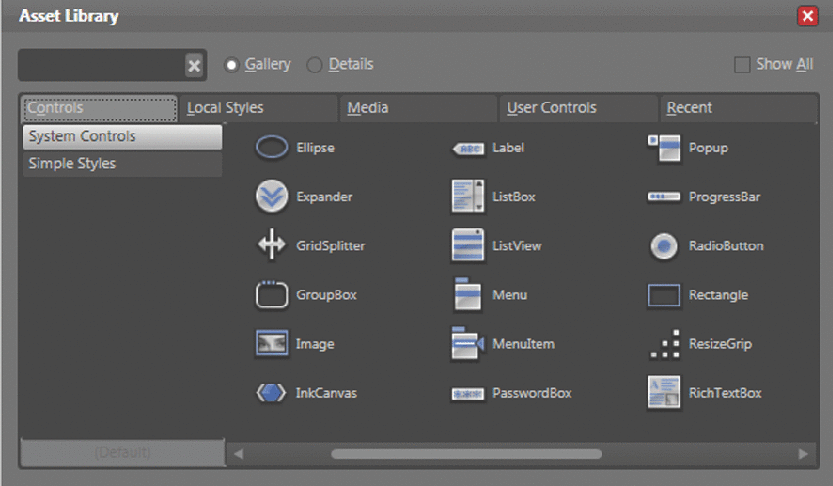
Figure 1: Select the ListBox control from the Asset Library.
Dr. Dobb's Journal April 2007
Microsoft's .NET 3.0 Framework includes several aggregate technologies that were specifically tailored for Vista. One of the most immediately recognizable is the inclusion of the Windows Presentation Foundation (WPF) expressed by the Extensible Application Markup Language (XAML). The reason for this is obvious—unlike other technologies like Windows Communication Foundation and Workflow Foundation that work behind the scenes, WPF is front and center with enough forward-thinking design innovations in its 1.0 implementation that it will be employed as an alternative to building Windows Forms-based applications, especially for Vista-only applications.
In the age of Rich Internet Application (RIA) development, Microsoft has reengineered its interpretation of what a Windows application should look like for the RIA age. While the web browser continues to host the applications and content that drive the Internet, the demand for richer UIs and better security coupled with the ease of deployment and version control that traditional web apps provide runs in parallel with end-users' expectations of what new OS features should deliver. As such, it's no coincidence that Microsoft has released WPF with the launch of its Vista OS.
While the technology can be executed on the XP platform, the hardware-accelerated visual flourishes that WPF can deliver are exclusive to the sleek Aero interface running on Vista. XAML, the new language constructed to describe WPF-based UIs, is a rich, albeit verbose, XML-based syntax in which it is even more painful to manually peck out code. However, that is exactly what was required by the technology's early adopters. XAMLPad, like the preceding Notepad-based XMLPad before it, provides some assistance to WPF interface developers by providing syntax highlighting and element-tree navigation, but it is a far cry from the drag-and-drop control construction of a Windows Form.
While work is underway at Microsoft to incorporate this ease-of-form construction in a future release of Visual Studio (codenamed "Orcas"), another alternative exists. This tool, formerly known by its codename "Sparkle," was built from the ground up to solely be used for the design and presentation of XAML-based applications. Previously known as the Microsoft Interactive Designer, the Blend graphic designer-centric construction toolkit is now included under the new Microsoft Expression line. The Expression family is a departure from the usual Microsoft UI look-and-feel because these applications were written using the WPF-XAML constructs; in fact, Blend was written using Blend. As a result, the UI is entirely customizable. What's more, the Expression tools have a dark theme by default because unlike the programmer-centric Visual Studio bright white UI, Blend and the other Expression products are graphic designer-centric. However, as of this writing, Blend is the most efficient tool for creating XAML-based applications because of the integrated construction toolset, component palette, and XAML code generators it supplies. Blend's only major shortcoming from a developer's perspective is that it lacks an integrated code debugger. Such functionality is expected to be available in Orcas, but not expected to be a part of the final Blend 1.0 build.
Before touring the program, download the trial version (www.microsoft.com/products/expression). Windows XP users first need to install the .NET 3.0 Framework runtime, which contains the Windows Presentation Foundation classes (Vista users already have .NET 3.0 as part of the base operating system)—a link for that download is available on the same page as the Blend trial.
Once installed and executed, the default grey-text-on-black-background can be changed to a more programmer-friendly theme via the Tools->Options menu. I tried to acclimate to the dark designer theme but my years of working with Visual Studio prompted a switch to the Expression Light theme after a few minutes.
The numerous toolbox Windows in modern day IDEs demand copious amounts of screen real estate and Blend is no different. I'm fortunate to have a dual-screen 3200×1400 resolution layout that makes app development so much easier, giving me a large design surface and code window to work with while keeping window clutter to a minimum.
One of the fastest ways to experience and understand XAML-based WFP applications is to select any of the demos that accompanies the Blend beta. However, this walkthrough begins with the construction of a new application that only takes minutes to complete. So close the initial project selection dialog, select New Project... from the File menu, type in a project name (such as "DDJRSSArticles") while leaving the default project type (Standard Application) and Language (C#), and click the OK button to be presented with an empty window into which you populate databound label, listbox, and textbox system controls.
With the main empty window selected, click on the "+ XML Source" button in the Data pane. This pops up an Add XML Data Source dialog box. Leave the default Connection Name (XMLDataSource) and type "http://www.ddj.com/rss/all.xml" in the URL for XML data textbox and click the OK button. This sets the XmlDataProvider source for the window, which can feed the other controls hosted within it. You can also change the title of the main window to "DDJ RSS Articles" via the Title field in the Properties->Common Properties pane.
Next, click on Asset Library (the dual down arrow—the bottom icon in the vertical toolbar permanently docked to the upper left side of Blend's main program window) to open the Asset Library dialog (Figure 1). Select the ListBox control and using the mouse, draw the outline of the control on top of the blank "DDJ RSS Articles" window. With that newly drawn ListBox control still highlighted, click on the ItemSource (Collection) label in the "Properties->Common Properties" window and select "Data Binding" from the drop-down list. A "Create Data Binding" dialog box will be displayed. Note that the dialog is already populated with the RSS-parsed tree data that can be quickly traversed for the specific element you wish to display in the data-bound ListBox. Select the rss->channel->item->title :(String) from the Fields tree and click the Finish button. If you selected the correct item and you have an active Internet connection, you should immediately see the results displayed in the DDJ RSS Articles window. Incidentally, there is an even faster way to create this active data-bound ListBox control by simply dragging the "rss->channel->item->title" element from the "Project->Data" window pane on to any area of the empty DDJ RSS Articles window. When you release the mouse button, a context-sensitive pop-up menu appears asking what type of control to create to represent this data field. Select ListBox from the menu and resize accordingly.
Finally, select Test Project from the Project menu to build and execute your first Blend-assisted XAML application. If you clicked the right items in the correct sequence, your version of the DDJ RSS Articles application should look similar to the one in Figure 2. Congratulations!
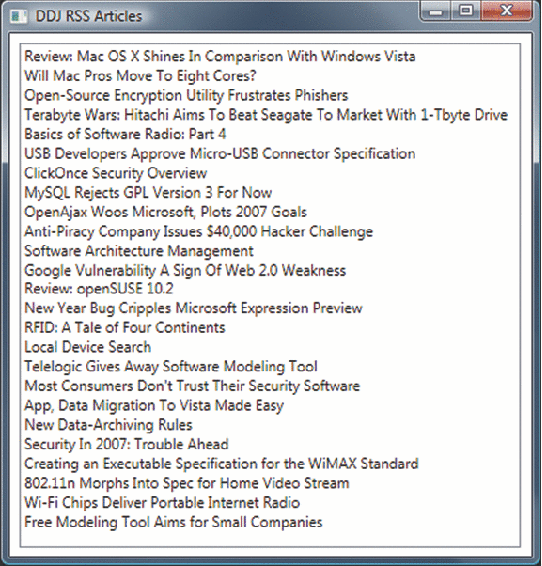
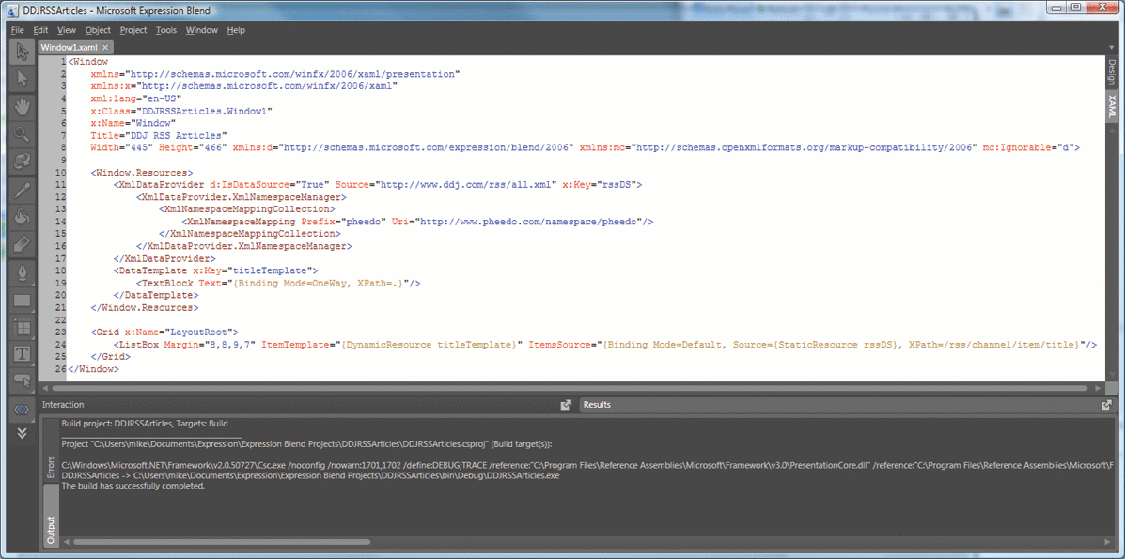
So there you have it. A working, standalone RSS feed display built with only a few clicks of a mouse and no handwritten code. Pretty cool! Of course, Blend wrote the code based on your placement of GUI elements and data-provider attachment but all that occurred literally behind the Design tab. To see the XAML code that was generated, click on the XAML tab just below the Design tab in the upper right corner of the Blend program window (Figure 3).
Understand the numerous UI choices that the Blend components have to offer by changing display attributes and examining the XAML modifications made to the source code. Append additional controls within existing design surfaces and see how these are nested within the host control and can bubble UI changes accordingly. Once comfortable with the power that WPF imbues, research the WPF examples and documentation included in the .NET 3.0 SDK. There is also an excellent book entitled Windows Presentation Foundation Unleashed (Sams, 2007) that's written by WFP Program Manager Adam Nathan.
While ultimately best-suited for graphic designers with some coding experience, Blend is also a XAML programming tool that offers Windows application developers one of the fastest ways to realize and explore the combined power of XAML and the Windows Presentation Foundation. Additionally, Blend offers programmers a headstart on their own WPF application ideas because the XAML it produces will be interchangeable with the WPF form-rendering functionality that future versions of the Visual Studio IDE will supply.
Several Blend-related web sites featuring additional code samples and XAML tips and tricks have begun to sprout on the Web, including www.expressionblend.com, by-expression.com, and even the Expression team's own blog at blogs.microsoft.com/expression. Also on Dr. Dobb's Portal, you can find a multipart interview with Brad Becker, Senior Product Manager for Microsoft Expression Blend; see www.ddj.com/mediaCenter.